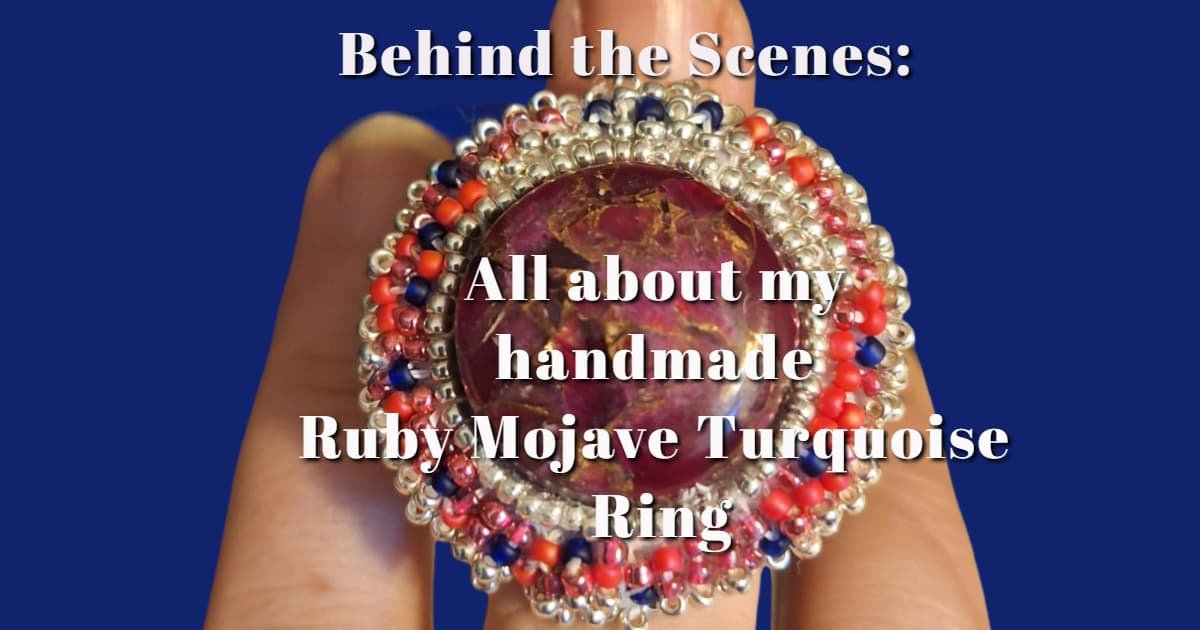
Hello, my darlings, are you ready to step with me behind the scenes and learn all about my handmade Ruby Mojave Turquoise ring? This is the newest of my one-of-a-kind handmade beaded ring creations.
Since I really suck at filming myself creating, I found a compromise. Since I wanted to share the progression from start to finished handmade treasure, I stopped throughout the creation process and took a few snapshots.
Today, I finally managed to create a slideshow reel for my handmade Ruby Mojave Turquoise ring, so you can just watch it flow on by. Go ahead and take a look at it, and when it is done, I’ll be back to give you some information about the process, the number patterns I stitched in for a blessing, and more.
If you like this clip/slideshow reel, please consider giving me a like, follow, reply, and share on my YouTube Channel. It would mean the world to me!
Let’s start with the basics:
Materials used to create this beautiful handmade Ruby Mojave Turquoise Ring:
1 Ruby Mojave Turquoise Cabochon – This is a genuine gemstone with a really interesting creation story. I requested that a hole be drilled through the center of it (you should have seen that on the clip) so I could double-secure it. This AAA-grade gemstone was purchased by me via one of my favorite Etsy sellers. It’s roughly 25 mm—so a very nice, robust piece.
Japanese Miyuki Delica 11/0 as well as Toho Round 11/0 beads – Again, I purchased them from a different Etsy seller. I do believe in supporting my fellow small businesses!
Both Wildfire and Fireline threads. * A beading needle (don’t ask me what size, I don’t pay attention to that most of the time any longer. I know, bad lama!)
Felt to bead embroider on. * E6000 glue. * Super soft suede for the backing.
A stainless steel adjustable blank ring. ***
A bit of information about Ruby Mojave Turquoise:
Ruby Mojave Turquoise is a breathtaking, specialized variety of genuine gemstone that originates from the famous Kingman Turquoise Mine in Arizona. To create its signature dramatic look, natural turquoise nuggets are processed using a hydraulic press to assemble them into a hardened composite. During this unique stabilization process, a brilliant magenta-red color enhancement is introduced to give it that rich, ruby-wine glow, while real bronze metal matrix is infused throughout the stone. The result is a stunning, durable cabochon that beautifully contrasts vivid crimson pools with shimmering, metallic veins of gold—ensuring that no two stones are ever exactly alike!
Fastening the Cabochon into Place
I wanted to create and build my handmade Ruby Mojave Turquoise ring to last, so instead of just gluing the cabochon into place with the E6000 glue, I ran the Wildfire thread through the pre-drilled hole I requested four times. This way, it won’t come loose. Yes, you can see a small bit of the thread at those two sides even after the silver-tone Miyuki beads were stitched into place to give it that bezel look, but to me, that is not a flaw. It’s proof of a securing technique that benefits the wearer.
The first number patterns with the silver-toned Miyuki beads
The first round of bead embroidery (the bezel) was done with the silver-toned Miyuki beads. Now, once you look at the finished ring, you can’t see that I beaded it using a number pattern.
This number pattern is my way of stitching a protection blessing and connection with your divine into it.
Regardless of whether you follow the Christian or the Pagan path, those numbers are sacred.
I would pick up at first 3 beads, stitch them in, secure them, then go through the last bead and add 5 beads. Stitch them in, secure them, and go through the last bead and add 3 beads again. This was repeated over and over again until the row was done and the beads were nestled snugly against the cabochon.
The sacred numbers 3 and 5:
In both Christian and Pagan traditions, the number 3 holds immense spiritual power as a symbol of divine completeness and wholeness. For those on the Christian path, it immediately evokes the Holy Trinity—the Father, the Son, and the Holy Spirit—as well as the three days leading up to the Resurrection, representing divine design and eternal life. In Pagan paths, 3 is deeply tied to the rhythms of nature and the divine feminine, most famously embodied by the Triple Goddess in her forms as the Maiden, Mother, and Crone. It represents the cycles of life (birth, life, death) and the realms of existence (earth, sea, and sky), making it a foundational number for manifesting protection and spiritual balance.
The number 5 brings a powerful energy of grace, movement, and elemental protection. In Christian theology, 5 is deeply symbolic of God’s favor and grace, frequently highlighted by the five holy wounds of Christ and the five books of the Torah (the Pentateuch) which lay the foundation for God’s law. For those walking a Pagan or Wiccan path, 5 is the ultimate symbol of protection and cosmic alignment, perfectly mirrored in the five points of the pentacle. Each point represents one of the sacred elements—Earth, Air, Fire, and Water—all crowned and brought into harmony by the fifth element, Spirit.
Switching to Toho Round Beads, different pinks and dark blue, and number pattern 2 with spirit bead interruption
While the first row was done with the Miyuki beads and the number pattern 3 and 5, laying around the cabochon, the second row (which you see as 2 and 3) was done with Toho round beads, working from the center outward and inward.
I used two beads each time, going outward, then two beads going inward. This was interrupted at irregular intervals by adding a spirit bead into it.
Again, this was done intentionally and with purpose.
The symbolism behind the outward/inward movement, the number 2, and the spirit beads
To me, the number 2 has always been about our duality of nature—a pairing of energy signatures that can be found within us. The sacred feminine, coupled with the sacred masculine. The yin and yang of our being. The balance of both light and dark, which is a natural aspect of our human existence.
The number 2 can also represent:
- Partnership and Sacred Union: Beyond the self, it symbolizes the coming together of two distinct souls or ideas to create harmony, cooperation, and a unified purpose.
- Choice and Decision-Making: It reflects the spiritual crossroads we often face, reminding us of the free will we possess to choose between path A and path B, and the discernment needed to find alignment.
- Intuition and Reflection: In numerology, 2 carries a gentle, receptive lunar energy that encourages us to trust our inner voice, practice patience, and mirror the peace we wish to see in the world.
The outward/inward motion—stitching the beads back and forth like that—represents the importance of looking without and within ourselves. It’s both introspection as well as interconnection with the world around us. Both are necessary for a healthy balance, as well as achieving awareness of self and the world around us.
The spirit beads are a reminder that without spirit (regardless of which path you follow), we cannot keep our balance nor can we attain true knowledge and wisdom. So, those spirit beads are a reminder of the Creator—a guardian that is ever-present with us, even when we are unable to see him with our human eyes.
The top part: The switch to silver and dark blue
f you look closely at my handmade Ruby Mojave Turquoise ring, you will notice that I switched from pink and dark blue beads to a mix of the silver Miyuki and the dark blue Toho beads.
On close inspection, you may notice that I have shaped a crown with them, again incorporating the number 3 (three dark blue beads) into the design.
This is to remind you that no matter what situation or stage of life you find yourself in, you are divine royalty. In the Christian path, the true follower and believer is often referred to as the son or daughter of the Most High. In the Pagan path, we are gods and goddesses/co-creators, and divinely charged with immense purpose.
Adding the super soft suede backing and the silver halo finish
Once the face of my handmade Ruby Mojave Turquoise ring was finished, it was time to add the backing. I traced the round shape of the ring, cut it out, and then glued it to the back of the felt, covering the stitches and securing them. I do not glue it all the way to the outside, but only about 95%. Then, I began to secure it by adding the silver halo—the outside beading of the ring.
The color silver, and its use in the creation of the halo, again has a bit of symbolism. Silver is deeply connected to the energy of the Moon, representing intuition, reflection, and the divine feminine. It is a color of pure spiritual protection, acting like a cosmic mirror that deflects negativity away from the wearer while magnifying the natural energies of the gemstones it surrounds. By framing the ring in a silver halo, it seals the piece in a protective, clearing energy that helps the wearer tune into their own inner wisdom.
Attaching the adjustable stainless steel ring blank and the compromise I made with myself for your benefit
Normally, I would use a peyote or brick stitch to create a beaded band to attach to the beaded ring face. That, however, depending on the size, can take several hours.
Meaning it would drive the price up more and would give you no leeway on adjusting the size. I have noticed by now that even though I receive a lot of really positive feedback on my beautiful, fully beaded rings with zero metal used, they do not seem to have found their audience yet. (I hope that they will in good time; I put a lot of thought and effort into everything I make).
I found a compromise for myself that I can live with. I create the face of the ring with my different beading techniques, but will use a stainless steel ring blank purchased from a different vendor instead of the fully beaded band.
This allows me to give you the ability to adjust the ring to fit your fingers and keep the price under $60 without cheapening my efforts completely.
The blank is glued onto the super soft suede backing using the E6000 glue, and then I added a small strip of the same suede backing over the small round blank part and across to the inside edges of the back of the ring.
Consider this a little eccentricity of mine. I like the softness and texture of the suede, and didn’t want to interrupt it with the coldness of the stainless steel. Besides, it feels so much nicer when the ring glides onto your finger.
A final word, a thank you, and where you can purchase this one-of-a-kind handmade Ruby Mojave Turquoise ring.
There you go—a breakdown of how I created it, and the meaning and symbolism of the different steps as I stitched my protection and blessing for the wearer into it.
There is only one of these rings available, and even if I decide to make something similar, it won’t be exactly the same. This is a spirit-led and very magical ring from yours truly.
If you love this ring and would like to own it, or give it as a gift to someone special who can appreciate the thought, effort, and craftsmanship that went into it, you can find it available in my eBay store.
I have the price set to $54 plus a flat-fee shipping rate of $5.00. I think you can agree that this is an excellent value for you. Remember that eBay does work with Klarna if you feel that this is a bit out of your price range. With Klarna, you can make payments.
I hope you enjoyed this post and clip.
Thank you, as always, for visiting with me and reading.
Until next time, my blessings go with you.
Artisan Regina L